How to Host an Astro Blog on GitHub Pages with a Custom Domain - How2Tech

Host your Astro blog free on GitHub Pages with your own domain and HTTPS: GitHub Actions deploy, DNS records, and what to check when it breaks.
Table of contents
- Step 1: Push your Astro project to GitHub
- Step 2: Add the deploy workflow
- Step 3: Set the Pages source to GitHub Actions
- Step 4: Set site, and leave base empty
- Step 5: Add your custom domain in GitHub
- Step 6: Set up the DNS records
- Step 7: Turn on Enforce HTTPS
- Do you need a CNAME file?
- If something breaks
- Tools I use
- The logic behind this
In this article, I will be covering everything related to hosting your Astro blog on GitHub Pages with your own custom domain. This particular setup will give you a free blog, your own domain name and HTTPS without paying anything for the hosting. So if you want to get your Astro blog live on your own domain then read this article till end. Hello guys! What’s up? My name is Prince Upadhyay and welcome to How2Tech. Technology. Explained. Simplified. So let’s start with the topic…
So since a static blog does not need a server so there is really no reason to pay for hosting every month. GitHub Pages is free and your site gets built and deployed every time you push your code, and that is it. In addition, a lot of the guides over there are written for Jekyll, and if you are using Astro then you end up jumping between the Astro docs, the GitHub docs and a lot of forum posts. The reason is simple, each one of them covers only one part of the story and you have to join the rest yourself.
So in this particular article I will put the whole thing in one place, from the push to the HTTPS padlock. One thing, the domain name itself you have to buy from a registrar, that part is not free, only the hosting is.
In this article I won’t be teaching you how to build the Astro site itself. Because, here I am assuming that your Astro project is already on your computer and it runs.
Okay? Let’s start.
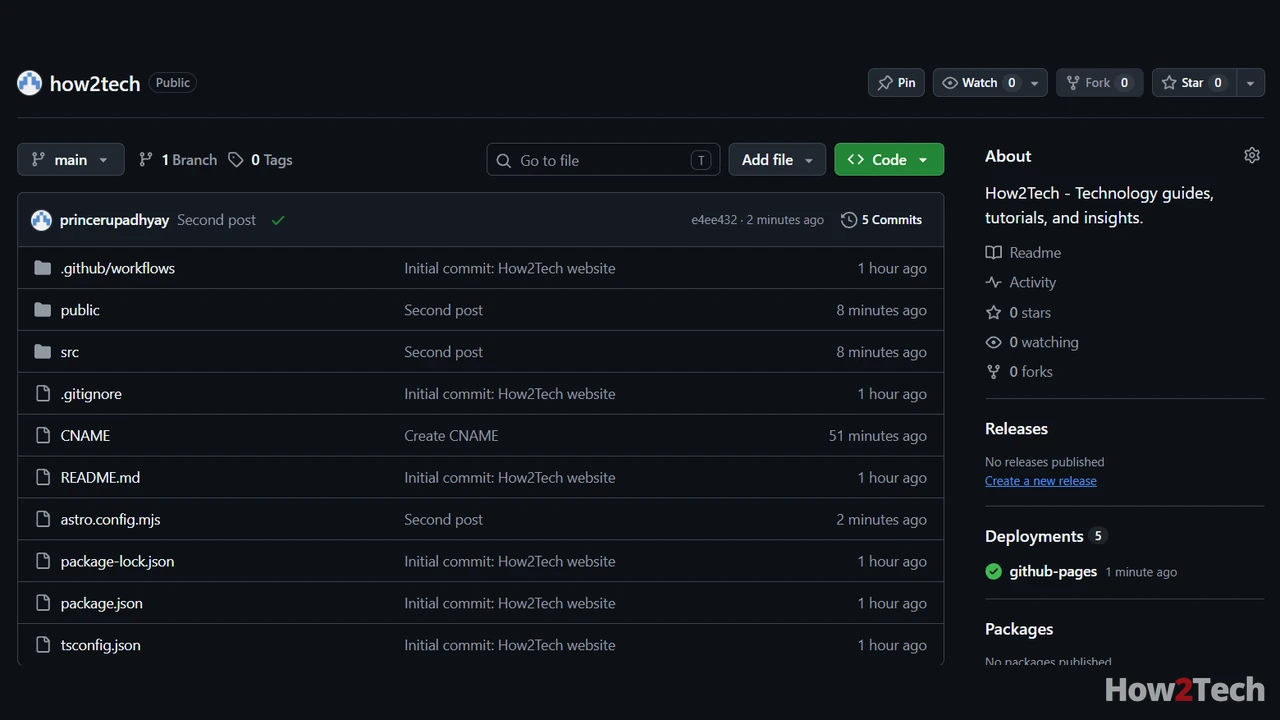
Step 1: Push your Astro project to GitHub
First thing, your project has to be in a GitHub repository and pushed to your main branch. If your branch has some other name then you will have to change it in the workflow file in the next step, so keep that in mind.
Step 2: Add the deploy workflow
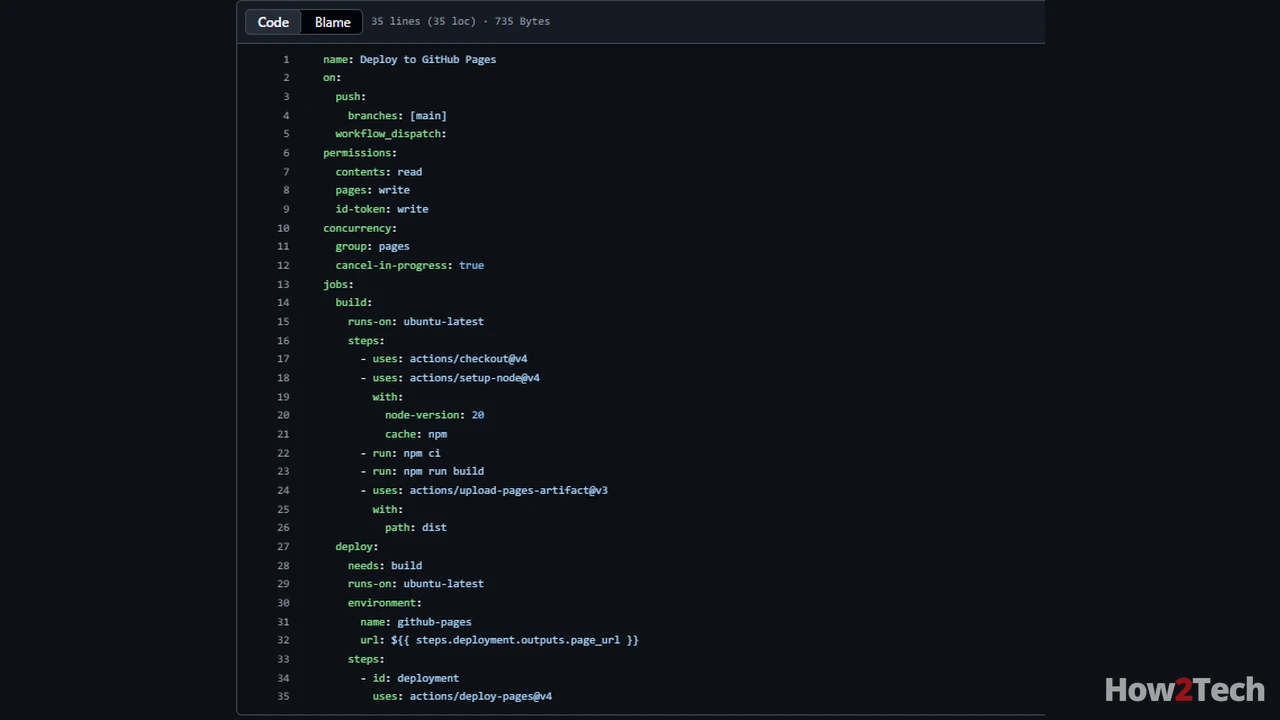
Second thing is the workflow file. Inside your project create a file at .github/workflows/deploy.yml and paste the workflow from the Astro deploy guide for GitHub Pages. It uses the official Astro action, withastro/action. Now I am not pasting the YAML over here and the reason is simple, the version numbers inside it keep changing, so always copy it fresh from the Astro docs. Two things to check after you paste it. The branch name should match yours, and the permissions block should be there with contents read, pages write and id-token write, because without that the deploy won’t have the rights it needs.
Step 3: Set the Pages source to GitHub Actions
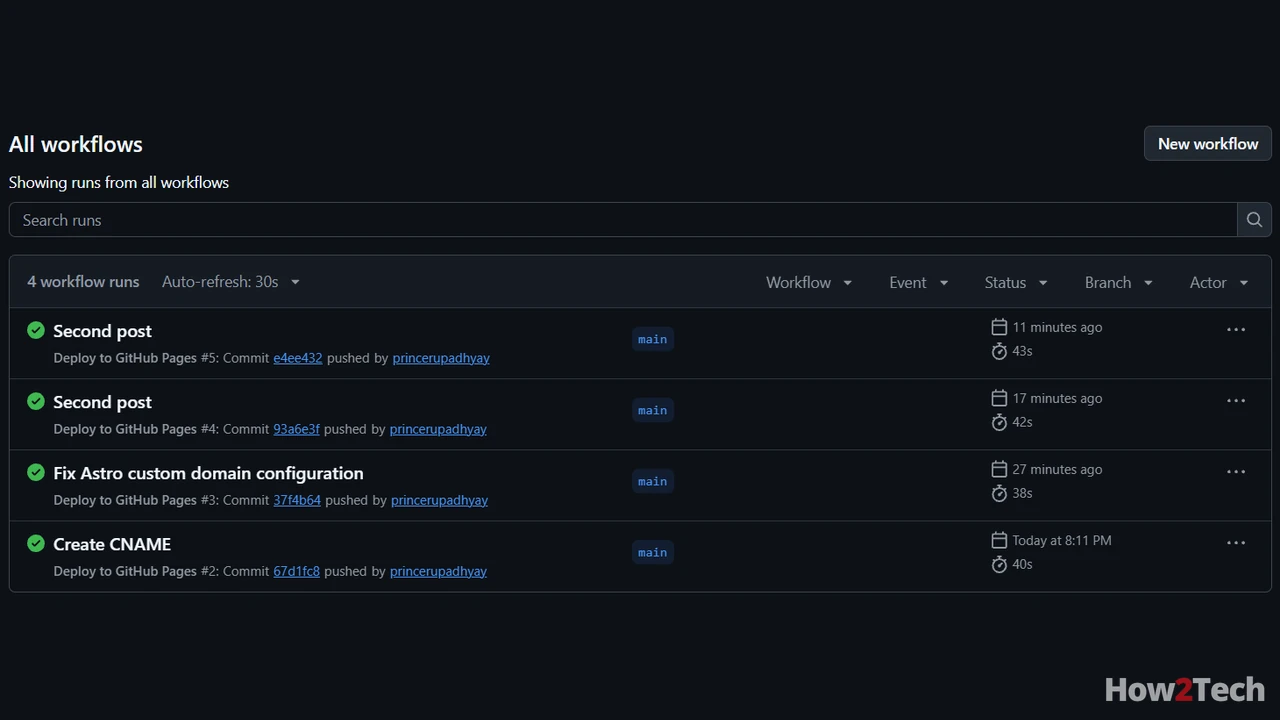
Third thing, go to your repository, Settings, then Pages, and under Source choose GitHub Actions. Now commit the workflow and push it and then go to the Actions tab and watch it run.
Step 4: Set site, and leave base empty
Fourth thing, and this is a really important one, is your astro.config file. Set the site value to your domain, for example https://example.com, and do not set a value for base. If you have a base over there from the time you were testing on the github.io address then remove it. I will explain the logic behind this later.
Step 5: Add your custom domain in GitHub
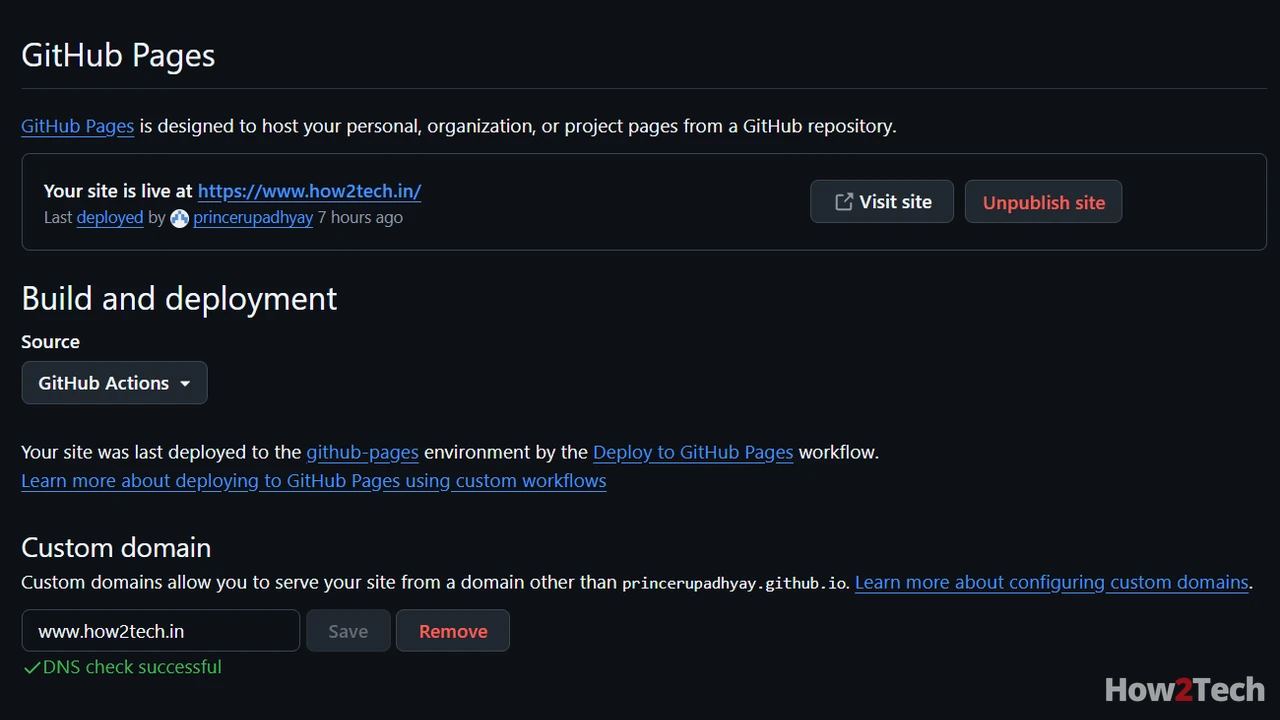
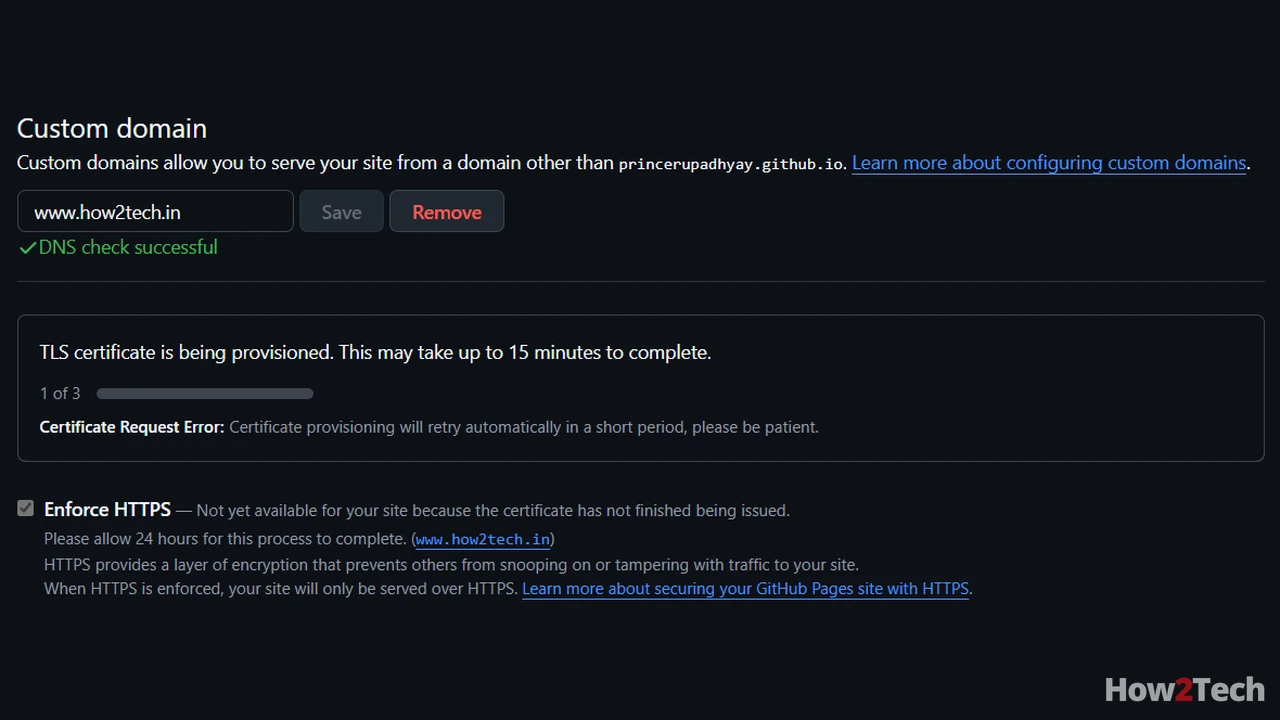
Fifth thing, add the custom domain in GitHub first, before you touch your DNS. GitHub says this in its own docs because if you set up the DNS without adding the domain to your Pages site then somebody else could end up hosting a site on one of your subdomains. So in Settings, Pages, type your domain in the custom domain box and click save. GitHub also recommends that you verify your domain in your account settings, so do that as well, it only takes a few minutes.
Step 6: Set up the DNS records
Sixth thing is the DNS records at your registrar. I recommend setting up both the apex domain, that is example.com, and the www version. For the apex domain you create A records pointing to these four GitHub Pages addresses: 185.199.108.153, 185.199.109.153, 185.199.110.153 and 185.199.111.153. GitHub also lists AAAA records for IPv6 in the same docs page if you want them. For www you create a CNAME record that points www to yourusername.github.io. And one more thing, point it to your username only and not the repository name, GitHub specifically says this in its docs. Don’t use wildcard records either, GitHub strongly says not to because of domain takeover risk.
Since you have both of them set up so GitHub will redirect between the two automatically, so you don’t have to do anything for that.
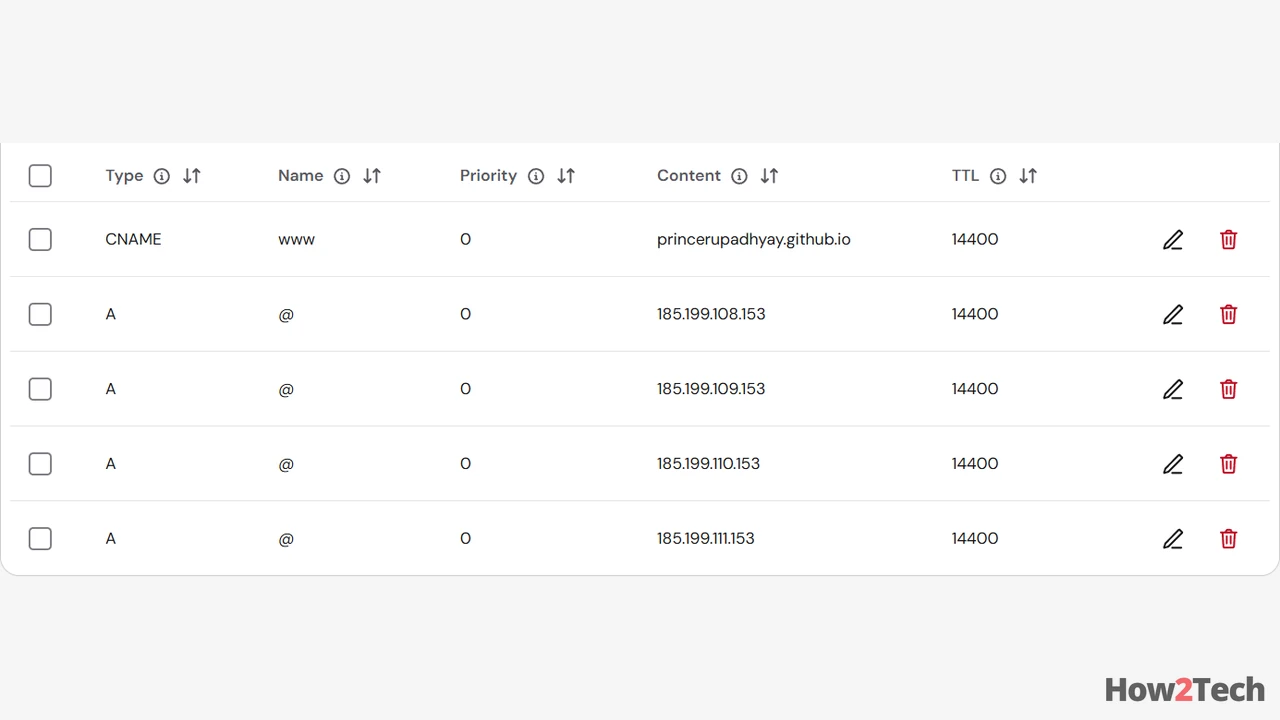
Now check the apex records with the dig command, put your domain in it and see that the results match those four addresses. If they match then your DNS is fine and the rest is just waiting. DNS changes can take some time to reach everywhere, so don’t panic if it does not work in the first minute.
Step 7: Turn on Enforce HTTPS
Seventh thing, go back to Settings, Pages. Once GitHub’s DNS check is done you will see the Enforce HTTPS option, tick that. GitHub gives you the certificate for custom domains for free. If the box is greyed out then it is still waiting for the certificate, so give it time and then come back.
Do you need a CNAME file?
Now there is one thing which can really confuse you if you read both the docs. The Astro guide says to add a file called CNAME inside your public folder with your domain in it. But the GitHub docs say that when you publish from a custom GitHub Actions workflow, no CNAME file is created, and any CNAME file which already exists is ignored and not required. So two official docs, two different things. What I can say safely is that for Actions deployments the domain you save in the Pages settings is what counts, and the file is not needed according to GitHub.
If something breaks
And if something breaks then these are the things I would check in this order. First the DNS records, use the dig command and see if they match the addresses above. Second, remove any old or conflicting records for the same name which are sitting in your DNS panel, because the records GitHub wants should be the only ones there. Third, remove the custom domain in Pages settings and add it again once, only after the DNS is right. If HTTPS is still stuck after that then there are a lot of people in the GitHub community forum with the same problem, the apex domain showing a default github.io certificate for example, so search it over there.
Tools I use
I generally use three tools for this whole setup, first one is GitHub, second one is Hostinger and third one is dig.
GitHub does the building and hosting and the certificate.
The DNS panel is where you point the domain to GitHub.
The checking tool is how you know that the records are right before you start blaming GitHub.
The logic behind this
Now let me explain the logic behind this. Why do we leave the base value empty? Because base is only for when your site lives inside a folder of the address, like username.github.io/my-repo. In that case Astro needs to know that your website root is not the real root. But with a custom domain your site sits at the root of your own domain, so if you keep the base over there then your links and your CSS will look for the wrong path and the site will break. And why GitHub Actions instead of the old way of publishing from a branch? Why? Because with Actions the build runs on GitHub every time you push, so you don’t have to build on your computer and commit the built files. You just write your post, push, and it is live.
So friends, this was How to Host an Astro Blog on GitHub Pages with a Custom Domain - How2Tech. Was this article helpful to you? Let me know which one you would prefer or like to use, in the comments section below. Till then, I’m signing off, So stay tuned and stay safe…😊